I'm excited to announce that the second major update to Coppice, version 2021.2, is now available to download. This release brings improvements to linking and navigation, plus a huge number of quality of life improvements and bug fixes.
You can find a summary of the new changes in the recent Sneak Peek post, or you can peruse the detailed release notes for a comprehensive list of changes.
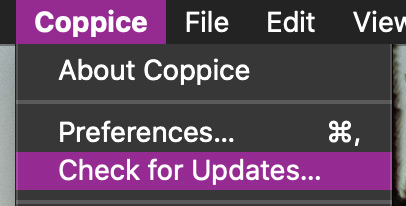
You can download Coppice 2021.2 by going to Coppice > Check for Updates… in Coppice's menu bar or by clicking the button below
After many delays, the next major release of Coppice is almost ready. I'm still putting the finishing touches to it but Coppice 2021.2 should hopefully be out in the next few weeks.
2021.2 is focused on improving navigation and linking within Coppice. I've also had the opportunity to use Coppice more intensively the past few months. While I've used Coppice throughout its development, this more recent use highlighted a bunch of smaller fixes and improvements that should make using Coppice a lot more enjoyable. So let's take a closer look!
Redesigned Page Selector
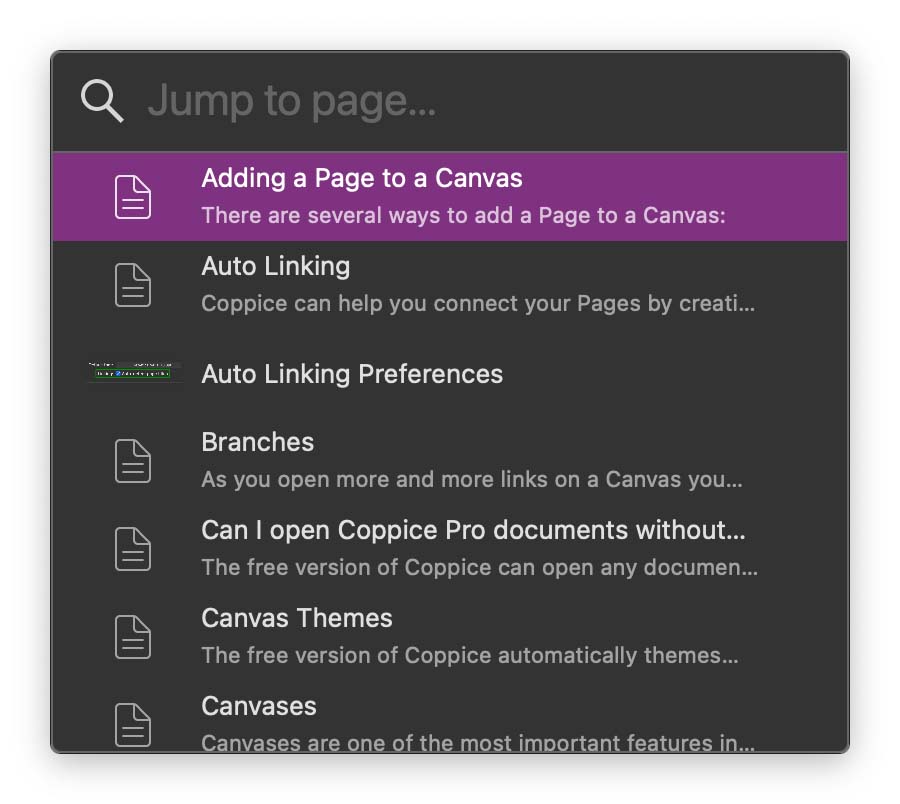
The Page Selector is used in many places in Coppice. It can be used for jumping to a Page, adding a Page to a Canvas, and linking to a Page. The initial design was quite narrow with large rows for each search result.
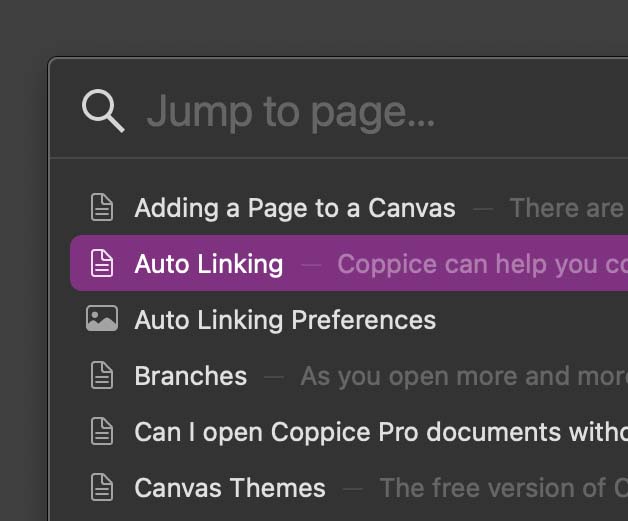
Part of the reason for these large rows was to allow for a preview of Image Pages. Unfortunately, these previews were rather small and not particularly useful, so I've decided to get rid of them. This opened up the potential for reducing the height of each row by moving everything into a single line, letting you see more results in the same space.
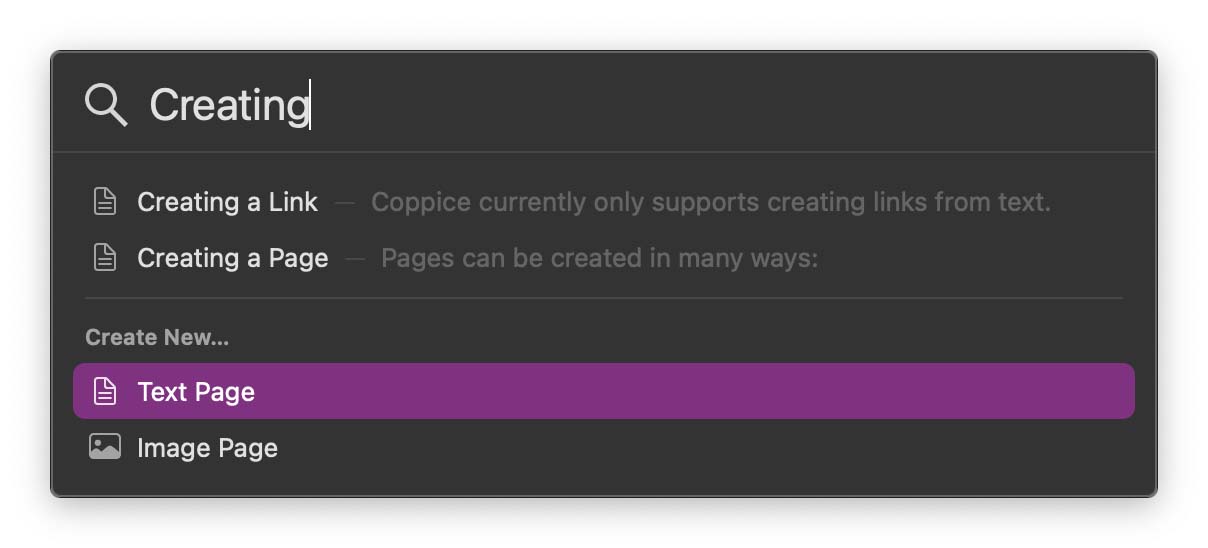
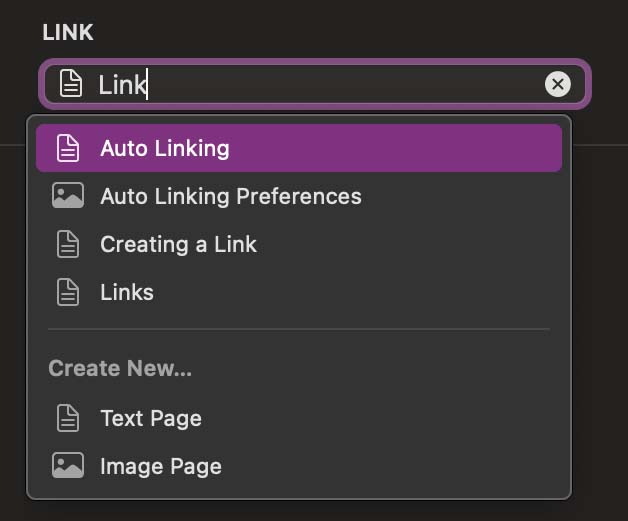
The next big feature added to the Page Selector is the ability to create Pages. Every Page Selector now has a list of options at the bottom. Selecting one of these will create a new Page, title it with what was entered in the search field, and then perform whatever action you were wanting to do. This makes things like creating a link to a new page far easier, and I can't wait for you to get your hands on it.
Link Inspector
Linking is one of the key features of Coppice. Since its release, Coppice has been pretty good at letting you create links (even helping find links for you). But the UI for editing and removing links left a bit to be desired, and there wasn't really any way to view where a link points without clicking on it and seeing what popped up.
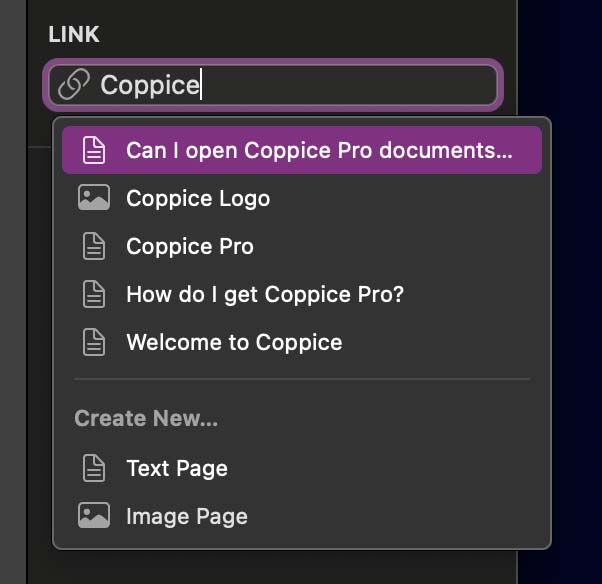
To solve this, I've added a new inspector: the Link Inspector. This inspector only contains one control, but it is incredibly powerful. If you select a link it will show it in the inspector. To change a link you can click the Link Control and start typing. Select one of the suggestions and the link will be updated. And to remove a link simply click the x button to the right of the Link Control.
The Link Inspector does more than just let you link to existing pages though. The auto-complete is actually a variant of the Page Selector so gains the same ability to create new pages. On top of that, you can start typing a URL to add an external link, no longer needing a separate sheet.
Quality of Life Improvements
As I mentioned above, I've been using Coppice a lot more over the past few months and realised there were a few areas where I could make small changes which improve Coppice in big ways:
You can now duplicate Pages, either from a context menu or by holding option when dragging Pages in the side bar.
Text Pages now support tables. This adds a lot more flexibility in how you lay out Pages.
The Welcome View now lets you drag documents out of its sidebar. This is great for when you want to make a quick copy of a document without opening it or having to search for it in Finder.
There are also numerous bug fixes, including:
Changing the font size or weight now works more reliably
Auto-linking no longer links Pages to themselves and now works with smart quotes
Ordered lists now start at the correct number
Pro Features
Finally, Pro users are getting some improvements. The first of these is in the new Page Selector, where you can hold down the option key to display the folders a Page resides in, great for when you have multiple Pages with the same name.
You will also find two new options in the inspectors. The first is the ability to exclude a Page from auto-linking. Sometimes you create Pages to act as templates, or maybe they have a common word as their title that is linking too often. Well now you can exclude them with the click of a checkbox. And for those who want to see Page titles permanently on a Canvas, there is now a checkbox to make sure they're always visible, without needing to hover over the Page
Finally, I've redesigned the Coppice Pro screen in preferences. Previously, logging into your M Cubed Account to activate Pro left you with a screen that was a bit plain and awkward to parse.
After a quick redesign, everything is better laid out, with additional options such as taking you to your M Cubed Account online.
There are still a few more bugs to fix and various support documents to update, but I'm hoping to be able to get Coppice 2021.2 and all these great new features out to you in the next few weeks. If you want to be the first to know when it's released, then be sure to subscribe to The Coppice Blog or follow @coppiceapp on Twitter.
This blog post is going to be a bit different. You may have noticed that things have been a bit quiet of late. It has been 6 months since Coppice 2021.1.1 was released. And in that time there has only been a single post on this blog. You're probably wondering what is going on with Coppice and when the next version is coming out. So I would like to give an update and explanation.
You'll also have noticed something in that last sentence: "I". Previously on this blog I've used "we" in all posts, though in reality they have all been written by myself: Martin Pilkington, founder and owner of M Cubed Software and creator of Coppice. It has very much being the Royal We. While Coppice does have some outside contributors, its development is almost exclusively carried out by myself.
In a way I've been hiding behind that "we" on this blog, and it has been a bit restricting. So going forward I'm just going to write things on The Coppice Blog in the first person. That way you know you're hearing directly from the person who writes the software you use.
I'd kind of forgotten one of the key assets of being an indie developer is being able to be out there a bit more and be closer to those who are using your apps. Not trying to hide that Coppice is written by a single person also has another benefit: it lets me better explain the process of developing Coppice, including things like delays.
The way I structure my work week is I spend about half of it doing contract work. This helps provide a steady income to allow me to spend the other half of my week working on other projects. Ideally "other projects" would mean "working on Coppice". Unfortunately, 2021 has mostly had other plans.
The lack of updates to Coppice have largely come down to two things taking away that extra time. The first was temporarily needing to spend more time working on contracting. Software development ebbs and flows and occasionally you need to put more time in on some projects, especially when software is getting close to release. So I lost quite a lot of time there.
The second big thing has been moving house. Needless to say, moving house during a pandemic, especially when lots of other people are having a similar idea and causing delays to things like banks and solicitors, is not the most relaxing and peaceful of tasks. I was often finding that the week days I'd set aside for Coppice were mostly being taken up with phone calls, emails, and reading paperwork. And by the weekend I was too exhausted and stressed to code. And this all went on for the best part of 6 months
Sadly the stress didn't end after moving house. Buying new furniture, sorting out problems with the house, and simply getting everything organised is still an ongoing problem, even several months after moving in.
When you're the sole developer, designer, support rep, etc for a company then things like this mean delays to the product. It's often a lot easier for big companies to deal with an individual not having as much focus, and it's easier for that individual to focus if they're only doing one thing. So hopefully being more transparent about the size of the "team" behind Coppice on this blog will make such issues a bit more understandable.
Thankfully, things are starting to settle down a bit more. I'm getting back into the swing of developing Coppice and am having a lot of fun doing so. The next major release, 2021.2, is coming along really well and I'm hoping to have it released before the end of October. It features a bunch of great new features and improvements, including a re-designed Page Selector, a new Link Inspector, and much more.
As always, if you enjoyed this post and want to stay up-to-date on everything to do with Coppice (including an upcoming post with a more in-depth look at Coppice 2021.2), then don't forget to subscribe to The Coppice Blog. Also be sure to follow @coppiceapp on Twitter, where you'll often see retweets from my personal account that show off in-progress features and bugfixes.
Tech Talk is a series of posts revealing some of the inner workings of Coppice and some of the technical challenges we've faced while building it. This time we want to cover how we implemented support for lists in Coppice 2021.1.
Our original plan was to quickly follow up our first release of Coppice with an update to improve text editing. Based on what we saw in Apple's APIs, we had expected this to be a relatively simple job and would have allowed us to get a release out before the end of 2020.
For the most part, we were correct. We managed to implement features such as editing line height and paragraph spacing very quickly and with minimal trouble. However, lists ended up requiring a lot more effort on our end to implement, delaying release for a few months. So what makes lists so much more difficult?
Text Editing 101
Rich text in Cocoa is represented by a class called NSAttributedString. This allows you to apply a series of attributes to parts of text. These attributes cover almost everything you can think of, such as the font, the text colour, the paragraph styling, and much more.
In mosts cases when editing an attribute, you just want to add or remove an attribute for exactly what the user has selected. For example, if you select some text and make it bold, you don't care if the selection is part way through a paragraph or even a word, you only make the selected part bold.
However, certain things require changing attributes beyond the selection. For example, if you select a word but then choose to right align the text, you want it to right align the entire paragraph. This means you need to calculate the range of the paragraph (or possibly even multiple paragraphs) that contain the selected text, and apply the new paragraph styles to that bigger range.
Unfortunately, lists add many additional points of complexity:
Each entry of a list is its own paragraph. The means that editing a list requires finding and editing all paragraphs in that list
Lists can be nested. If you edit the root level of a list (e.g. changing from a bulleted list to a numbered list), you don't want to apply those edits to any nested entries.
Lists are not just attributes. Almost every other change you can apply to text or a paragraph simply requires editing the attributes. However, lists also require modifying the text. You need to add, modify, or remove the markers at the start of every list entry.
There are other forms of complexity as well. If you hit return, it should create a new list item. Hitting return while on an empty line should end the list. And inserting a new list item part way through a numbered list should shift all the numbers below that point. Thankfully, these sorts of changes are handled by a Cocoa class called NSTextView which handles the actual text editing.
However, in order for NSTextView to know how to handle these things, we need to mark up our NSAttributedString with information on the location and type of lists. This is done with a class called NSTextList.
NSTextList
NSTextList is a fairly simple class that represents a single list. It only has 3 properties:
markerFormat - a string representing the marker. For example, if you wanted a numbered list with markers like #1., #2., #3. you could specify this as #{decimal}.
startingNumber - this is only relevant to ordered lists, but lets you change the starting point of the list
listOptions - Some additional options that aren't really relevant to us.
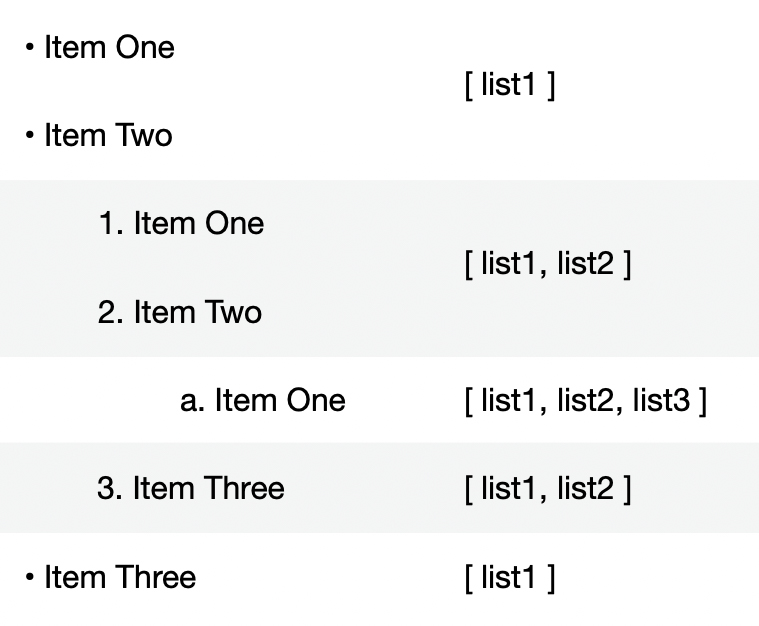
Each NSTextList represents one "level" of a list hierarchy. These levels are stored in the textLists property on an NSParagraphStyle. If you have a flat list, this will just hold a single NSTextList. In nested lists, it will hold all the parent lists too. For example, if you are 3 levels deep in a list, you would have 3 NSTextLists, one for the root level, one for the second level, and one for the deepest level.
By setting these NSTextLists, you can give NSTextView enough information to let users make changes to the list through regular text editing. However, NSTextView will not actually respond to any changes you make in code (for example, adding a list). That requires a LOT more work…
How to Modify a List
So let's say you have selected some text and want to modify the list attribute in some way (be that making the selection a list, removing a list contained in the selection, or modifying an existing list in the selection). You have the selection and you have a new NSTextList with the changes, but how do we go about correctly modifying the text?
1. Calculate the range and level of the list
In order to make any changes we need to know the full range of the list in text. We also need to know what level of list to change if we have a nested list. The behaviour in most apps seems to be that you should edit the highest level in the selection. So if you have 3 levels in a list and your selection covers entries in levels 3 and 2, then any changes should apply only to level 2.
Thankfully, these calculations aren't too difficult. To find the level, you simply enumerate all the paragraph styles in the selection and find the one with the shortest textLists array.
(Note: to perform the calculation we created a "List Calculator" class so we can store the values in a property while we perform a calculation. We also zero index the levels, because arrays.)
For the range, you again enumerate all the paragraph styles in the selection. This time though, we can use some helper methods to find the range of the list (if there is one) or paragraph (if there isn't). You then combine these ranges together to get the full extent of the list (or the paragraphs to convert to a list).
var newRange = paragraphStyleEffectiveRange //From enumerating the styles//If we're in a list then we need to get the full range of the list, which may be outside the selection rangeif let list = paragraphStyle.textLists.last {
let listRange = textStorage.range(of: list, at: effectiveRange.location)
if (listRange.location != NSNotFound) {
newRange = listRange
}
} else {
//If we're outside of a list then we just want the current paragraph
newRange = (textStorage.string as NSString).paragraphRange(for: effectiveRange)
}
//Merge the rangesguard let editRange = self.editingRangeelse {
self.editingRange = newRange
return
}
self.editingRange = editRange.union(newRange)
Once we have our range and level, we can move to the next step
2. Update the Attributes
Next, we need to update the attributes. This is actually the simplest step, though first we need to store a copy of the attributed string before we modify it (it will become apparent why in the next step).
We start to enumerate the paragraph styles in the list's range. All we need to do here is take each paragraph style's textLists array and modify it by either adding, removing, or swapping the NSTextList
var textLists = newParagraphStyle.textLists
//If we're setting a list then we want to replace the list at the desired levelif let listType = listType {
if (textLists.count > level) {
textLists[level] = listType
} else {
textLists = [listType]
}
} else {
//If we have no list then we're removing all lists
textLists = []
}
newParagraphStyle.textLists = textLists
We then update the attributes on the attributed strings.
3. Update the List Markers
Finally, we need to update the list markers. This happens in two stages.
The first happens while we're enumerating the paragraph styles in step 2. We need to enumerate the lines in the range each paragraph style covers in the old copy of the attributed string we made (as a single paragraph style may be shared across multiple paragraphs). The reason we enumerate the old copy of the attributed string, is we want to calculate the ranges for the old markers so we know what range of text to replace.
(oldString.string as NSString).enumerateSubstrings(in: effectiveRange, options: .byLines) { (substring, substringRange, effectiveRange, _) invar existingRange = NSRange(location: substringRange.location, length: 0)
//If we had an old list then we want to calculate the marker so we can get its range for replacementif let oldList = oldParagraphStyle.textLists.last {
var itemNumber = oldString.itemNumber(in: oldList, at: substringRange.location)
//We need to manually handle the startingItemNumber as itemNumber(in:at:) doesn't (despite being giving the list)if (oldList.startingItemNumber > 1) {
itemNumber = oldList.startingItemNumber + (itemNumber - 1)
}
//We just need the length of the marker as the location is always the start of the line//We also add 2 as we always have a tab before and after
existingRange.length = oldList.marker(forItemNumber: itemNumber).count + 2
}
//Add the range and text to replace. We don't actually replace here as we don't want to mess up enumerateAttributes()if let list = textLists.last {
replacements.append((existingRange, "\t\(list.marker(forItemNumber: textStorage.itemNumber(in: list, at: substringRange.location)))\t", newParagraphStyle))
} else {
replacements.append((existingRange, "", newParagraphStyle))
}
}
We store the existing marker range, the new marker, and the paragraph style for that marker in a replacements array for use in part 2.
Part 2 is actually replacing the list markers and happens after we've finished enumerating the paragraph styles. The reason for this is that modifying the list markers can change the length of the text, which can mess up range calculations. By doing all the calculations first, we can then do the replacements in reverse order, ensuring we never have to adjust any ranges.
//Going from back to front (so the ranges remain valid) apply all the list replacementsfor (range, string, paragraphStyle) in replacements.reversed() {
textStorage.replaceCharacters(in: range, with: string)
//If we're adding a list then we need to make absolutely sure what is added has the paragraph style//This is especially true for the earliest range we're adding as it may use the attributes of the text beforeif (range.length == 0) {
let addedRange = NSRange(location: range.location, length: string.count)
textStorage.removeAttribute(.paragraphStyle, range: addedRange)
textStorage.addAttribute(.paragraphStyle, value: paragraphStyle, range: addedRange)
}
//We also want to update the selectionLocation so the cursor goes back to the start of the location, which may have shifted due to other list items changing aboveif (range.location < selectedLocation) {
selectedLocation += (string.count - range.length)
}
}
And with all that done you should now have correctly updated lists in your code.
That is quite a lot of code, but you can see a more complete version in a demo project here (available under an MIT licence). You may be wondering why we are sharing this if it took us so much work to implement. Isn't this just helping potential competitors? Maybe. But we believe that a rising tide lifts all boats.
Proper support for lists is a great feature to have in Coppice, but it doesn't define Coppice. If someone takes this code and uses it to implement list support in their app, then that's great. The Mac platform gets a little bit better. And who knows, maybe somebody has a better way of doing this that we've missed and they'll let us know about it.
If you enjoyed this post, or just want to stay up-to-date on everything to do with Coppice then don't forget to subscribe to The Coppice Blog or follow @coppiceapp on Twitter.
Coppice 2021.1.1 is now available. It fixes some UI issues with the Link/Jump to Page dialogues and the search sidebar.
You can update Coppice by going to Coppice > Check for Updates… in the menu bar in Coppice, or by downloading directly from our website. A full list of changes are available on our release notes page